Lab Report for Chemistry Example: Format, Sample & Template Science Report
Learn the easy way to make a lab report from a chemistry example. Master the lab report format, use our sample lab report as a guide, and produce a lab report template for your science report. Easy.
First, let’s discuss why a science report is an important thing to learn. Second, Dr Scott will debunk the myth that your science report is a difficult thing. Third, we show the step-by-step process to write up a good science report, using a chemistry lab report example.
Why Write a Science Report?
- Reports are part of life, and report writing will help you understand them. Examples of everyday reports include bills, invoices, taxes, food labels, blood tests, and report cards. Please stop acting like reports are something that teachers made up to make school less fun.
- Writing a science report will get easier with practice. As with anything, the first time is always the hardest. That’s why it’s important to write up your first science report… otherwise reports will confuse you for a lifetime. The world is full of reports, so why not get good at them?
5 Most Common Reasons for Not Writing a Science Report
Based on a study of 7,000 students,* Dr. Scott scientifically analyzed the following 5 most common “reasons” (excuses) for not writing reports. His analysis irrefutably proved that all 5 excuses are totally false and without any merit whatsoever.
“This looks strange. I don’t get the format.”
More than anything, science report writing is a style of writing. There are many styles of writing, and they all have their particularities. For example, a college admissions essay had better use the word “the” properly, whereas newspaper headlines cut out the word “the” to save space.
Style is about being consistent and being organized, not about following rules. Style, by its very definition, is something that you gain with practice. You will learn how to save time and effort by organizing things into paragraphs, sections, lists, bullets, tables, etc as you feel appropriate. You cannot possibly develop a science report style without writing that report. Just do it!
“I got a bad result. Or had a bad experiment. “
The purpose of a science report is to explain what went wrong. You are “not allowed” to brag about your successes in a science report. Therefore, there is a lot to say about bad results, which makes writing the lab report easier. Not harder. Easier.
If you are expecting a perfect result from a perfect laboratory experiment from a perfect human, you should probably do science on some other planet. Because perfect laboratory experiments don’t happen here on Earth. Never. Not even once.
“I don’t understand everything.”
Not understanding everything is called life here on planet Earth. Anybody who claims to understand everything is a liar. This is a scientific fact.
The purpose of science is to produce something… like a report… based on imperfect knowledge of an imperfect world.
“I am stuck on step #4 (or whatever step) therefore all progress must immediately and forever stop.”
There are 23 steps to writing a lab report. Sometimes some of the steps don’t go so well. So be it. You can still do all the other steps.
The most important aspect of a science report is that it looks like a science report. If it has most of the right steps in mostly the right order, it’s going to turn out okay even if it’s not perfect. Remember, there is no such thing as a perfect science report. Focus on what you can do. Don’t focus on what you cannot do, unless you enjoy being unhappy.
“I can’t start with blank paper and create something original.”
First, yes you can. Stop saying you cannot.
It’s true that your very first science report may be one fo the hardest tasks of your life. Seriously. That’s why we made this guide. Once you follow the 23 steps to make your first good report, however, you can use it as a lab report template in the future. So you will never, ever have to truly start from scratch again after this. Writing your first science report is a once-per-lifetime experience that will benefit you for your entire lifetime. Guaranteed. That’s a lot of value for a few short hours.
*About This Study
Dr Scott has professionally evaluated the opinions of over 7,000 students writing lab reports. Note that he never asked for these opinions, certainly didn’t want them, and definitely didn’t appreciate the sarcasm, cynicism, anxiety, fear, disgust, sadness, annoyance, anger, rage, and temper tantrums associated with the delivery of such “data.”
Dr Scott was for some time stuck in his teaching due to these ununderstandable, bad, and strangley formatted opinions. You might say that Dr Scott was overwhelmed by sarcasm, cynicism, anxiety, fear, disgust, sadness, annoyance, anger, rage, and temper tantrums regarding teaching about lab reports. Yet, he started with a blank piece of paper and produced the following 23 step guide found below. It’s not perfect, yet it has helped thousands of learners just like you.
Might this be the lesson within the lesson?

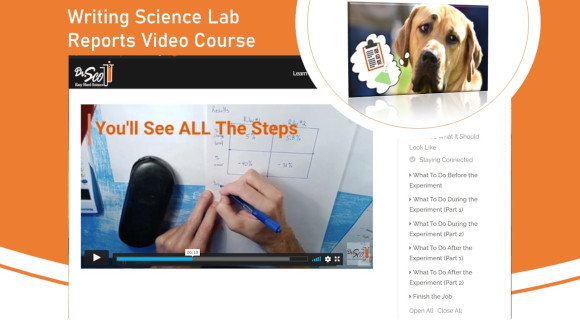
Writing Science Lab Reports Video Course
Lab Report for Chemistry Example: Format of a Science Report
Follow These 23 Steps to Success
The most important thing is to have all 23 parts of a lab report in the correct order.
1. Start with paper and pen:
Use pen (blue or black ink) and blank computer paper or graph paper. Don’t use pencil, don’t use lined paper. If it needs to be typed up, do it by hand first then type it as a second draft. The computer is going to complicate things if you don’t have a draft on paper. Trust me on this.
2. Name, Date, Purpose and Procedure
Make a simple header including your Name, a Date, and a Title.
Just pick a Date— it could be the date the experiment started, when the experiment ended (sometimes it takes more than a day), or when the report was written. Don’t allow yourself to get hung up on little details like this… just pick a Date that seems reasonable and keep going. There are 21+ more steps, after all.
Pick a Title. The experiment might already have a name, because, for example, you read about it in a lab manual or saw a video on the internet. If not, make something up that relates to the Purpose (comes after title). Decide a formatting style– do you capitalize, underline, center, etc? Again, don’t allow yourself to get hung up on the details. Just pick a style for the Title and keep going.
Create a section called Purpose or Goal. Decide the formatting style, like a colon (:), underlined, centered vs left justified, etc. Just pick something, and remember to format all the below sections with the same style. Write the purpose or goal in probably 1 sentence. Keep it short.
Create a section called Procedure. Use the same formatting style. Keep it short, definitely don’t write a book. The writing comes later… List, bullet, or number the basic steps. You may include an equipment list, or the equipment can be explained in the steps. In addition to what you did, the Procedure should say what you measured. You could include a diagram or not.
If you have some sort of teacher that gave you some sort of prelab assignment, do the prelab now. The prelab isn’t really part of a formal lab report, yet this might not be a formal lab report. The prelab generally would go after the Procedure, unless your teacher told you to put it somewhere else, such as at the end.
3. The Super Important Data Table
The Data Table is the heart of the report. Make it at least twice as big as necessary. It should probably take up a whole, entire piece of paper. Make it big. Bigger… Yes a whole page big. I am not kidding. Count exactly how many data (measurements or observations) you have. Decide how they can fit into a grid, and draw the grid with a ruler. Make it nice and straight, and, again, it should be really, really big. Bigger! Even bigger!!
4. Checking Your Work
Stop for a moment to reflect. Your Procedure talks about collecting data. Is there exactly one grid square for each measurement? Do all the measurements fit in the Data Table grid? If not, you have a problem. Fix it before moving on.
5. Determine Precision and Bias of Measurement Instruments
Be sure to always use a Metric instrument. Note how many decimal places it reads to. Be sure to always write the correct number of decimal places everywhere in the report, no matter what.
6. Recording Your First Measurement
As you perform the experiment, record your data in the Data Table. Make sure to use the correct number of decimal places, and always put a unit (like cm for centimeters) after every single number. Always have a unit and the correct number of decimal places. Honestly, this is the main thing most teachers look for when grading lab reports. It’s not about having good data, it’s about having the correct number of decimal points and units.
7. Planning and Patience
Again, take a moment to reflect. Does it seem like all your collected data will fit cleanly into the Data Table? If not, stop and make a better Data Table.
8. Recording Your Other Measurements
Keep going and get all the data into the Data Table.
9. Side Calculation of Your Result
Got data? Probably you need to calculate something. Do it on scratch paper, not on the report. Get the math all worked out on the scratch paper.
10. Side Calculation of Percent Error
Got a result? On the same scratch paper, work out the calculation for percent error (if you know the “correct answer”). Or skip this step.
11. Selecting Sample Calculations for the Report
Don’t write all your calculations in the report, just one example, or sample, of each type of calculation. For example, if you calculated the volume and surface area of 4 objects (8 calculations total), just write 2 calculations (1 surface area, 1 volume) in your report. Decide which calculations to write… just pick and keep moving.
12. Writing Sample Calculation in the Report
Create a section called Sample Calculations. Write down one example of each type of calculation. Be really, really neat and show all the steps, so that somebody could figure out what you did. It’s about showing the steps, not getting a good answer. The answer can be bad and that’s totally fine. On the other hand, it’s super uncool to just show an answer, even a good answer, without showing the steps in the calculation.
13. Results in a Table
Create a section called Results. Make a table for your results, just like you made a table for your data. Make it big. Bigger! Do all your results, including percent error and averages, if you calculated such things, fit? If not, do it again.
14. The 4 Main Elements of a Discussion
Create a section called Discussion. Now put the report aside and stop writing on it. You need to work out 4 paragraphs as rough and perhaps second drafts before copying it over to your report. Don’t get anxious and expect to miraculously inject a perfect Discussion directly into your report instead of first making a rough draft on scratch paper. You are almost there, so don’t ruin the report by writing on it before you have a solid rough draft.
15. It’s Not Rough Draft
The science lab report should have a reasonably polished Discussion, to the best of your imperfect writing ability. Proofread that rough draft, then proofread it again… and once more again… before transcribing it into your report. Your report should not look like a rough draft. Polish it first.
16. Discussion: Paragraph 1
What did you intend to measure (the Purpose) vs actually measure? What did you assume?
17. Discussion: Paragraph 2
Where your results high or low? By how much?
18. Discussion: Paragraph 3
Why were your results high or low? Give a science reason. The most important aspect of the whole report is that this specific paragraph says something scientific. Not my dog ate my experiment, but an actual science explanation. If you really cannot come up with anything, at least pick a few vocabulary words related to the experiment and use them in sentences that show you understand their definitions. Again, this specific paragraph has to, at bare minimum, sound scientific. You can probably fool your teacher into grading your report well so long as this paragraph sounds reasonably scientific. Be sure to put some honest thought into this one… it’s highly unlikely that you find something to plagiarize off the internet that would match the rest of the report.
If you really need to cheat, don’t do it here because it would be SOOOOO obvious to anybody who knows how science works. Cheating is hard work, and you are just going to waste lots of time trying. Be the type of person who finishes reports, not a time waster that never finishes things. Your life will be easier this way.
19. Discussion: Paragraph 4
Suggest recommendations to improve the experiment. Don’t redo the experiment. Your result is your result, for better or worse, and it’s on your “permanent record” at this point. Just write down something that somebody else at some other time and place could possibly do to make the experiment better. Don’t actually do it. Just recommend.
20. Use a Science Analogy
Think you got a good Discussion? It would be greatly enhanced if you could come up with an everyday analogy to explain something scientific in layman’s terms. Your report will never be perfect, yet the next report could be better by including an analogy in the Discussion. This is the type of higher level writing that teachers like for A+ grades. If it’s your first report, don’t get hung up on this. Just keep moving.
21. Proofread the Discussion
You transcribed the Discussion into your report. Proofread it. Again.
22. How to Write a Conclusion for a Lab
Here’s how to write a Conclusion of a lab report: Create a section called Conclusion. Then just restate the (main) result(s) in a sentence or three.
Keep it short, keep it simple, don’t be creative, and definitely don’t introduce any new ideas in the Conclusion of a lab report. Just conclude by restating the result(s). If you forgot to say something important, go back and discuss it in the Discussion. Never discuss anything in the Conclusion. This is probably the worst mistake commonly made. Don’t ruin it at the end. Just conclude.
Discussion vs Conclusion: Do you see the not-so-subtle difference between the Discussion vs Conclusion? The Discussion always discusses things at length, the Conclusion never does.
23. Assemble Your Report & Keep a Digital Copy
Be organized. Number your pages. Staple it. Scan it into a pdf. (Try Camscanner app for a phone, it’s free and easy). Give it a good file name. Email yourself a copy of your beautiful report so you never lose it.
Lab Report for Chemistry Example: Format of a Science Report
Follow These 23 Steps to Success
The most important thing is to have all 23 parts of a lab report in the correct order.
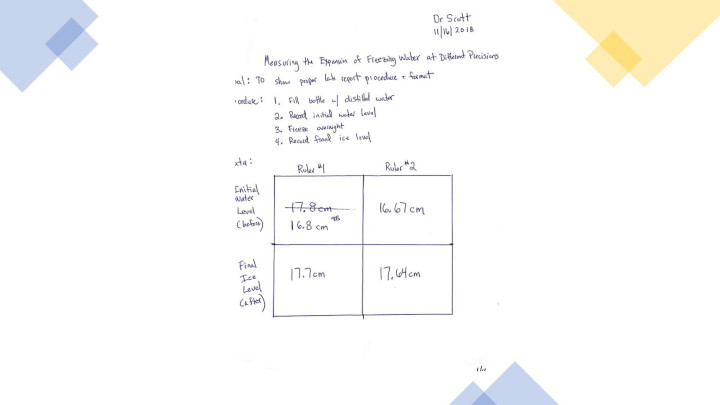
Lab Report for Chemistry Example: Sample of a Science Report
Click image to download the pdf of a sample science report. This lab report for chemistry example was written for an experiment to explore by how much and why does water expand when it freezes.
You can find more details, including over 4 hours of highly detailed videos explaining the above 23 steps, in the short course Writing Science Lab Reports. If you are interested to learn more about the science of why does water expand when it freezes, you can learn about this in Immersive Chemistry First Semester. For now, you might note it’s totally possible to write a good report about the expansion of freezing water, without having perfect knowledge of exactly why does water expand when it freezes in the first place.
Lab Report for Chemistry Example: Template of a Science Report
By following the 23 steps above, you have successfully completed a good lab report. Did you do it? Or just think about doing it? Thinking about report writing makes it harder, while doing it makes it easier. Just do it!
Now, you can use your science report as a lab report template. Never start from scratch again. In the future, use your lab report template as a guide. If you have all the parts of a lab report in the right order, it’s going to look good. You can continue to hone your style and science writing skills, now that you have the basics down.